Anatomy of creating a Houdini asset.. 1..2..3.. Profit!!
In this blog we'll be looking at what it takes to create a standalone Houdini asset and upload it to Orbolt. We'll start with our fancy teapot model.
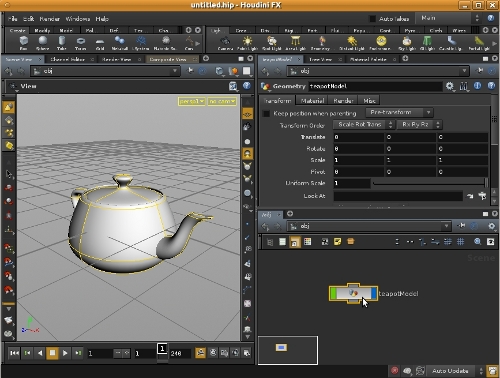
This is our starting scene.
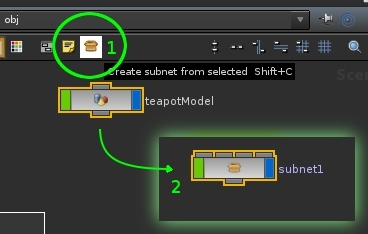
Subnet your nodes
If your setup has multiple objects, first part is to select all objects and collapse them into a subnet. This groups all of the objects into a single node. It makes sharing assets easy as a single node will contain everything that's needed. If you only have a single node/object you can skip this step if you wish (though you can still wrap a single node into a subnet, which future-proofs your asset as you may potentially decide to add more objects later on).
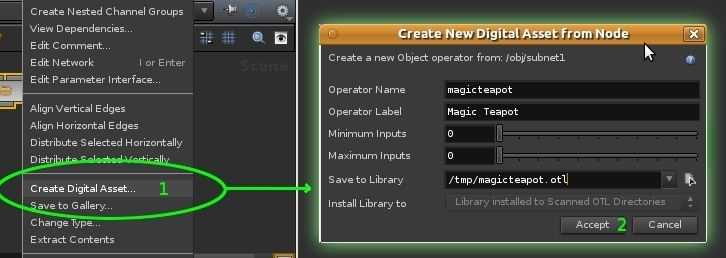
Create Houdini Digital Asset
Next step is to create a Houdini Digital Asset. Click with the right mouse button on the subnet node and choose Create Digital Asset. This opens a window that lets you name your asset and where to save the asset .otl file. (Operator Name is used internally by Houdini; users will see the label in the Tab menus).
Build your asset interface
After the initial creation the asset will have a transform and subnet folders. Since this is our custom asset we will add a control to adjust the shape of the teapot. You can drag and drop promote existing node parameters to top level controls as well as add custom parameters. To keep things organized we'll add our size control into a new folder called 'Controls'. Naming things and grouping them in the interface into logical parts makes the asset easier to use by others.

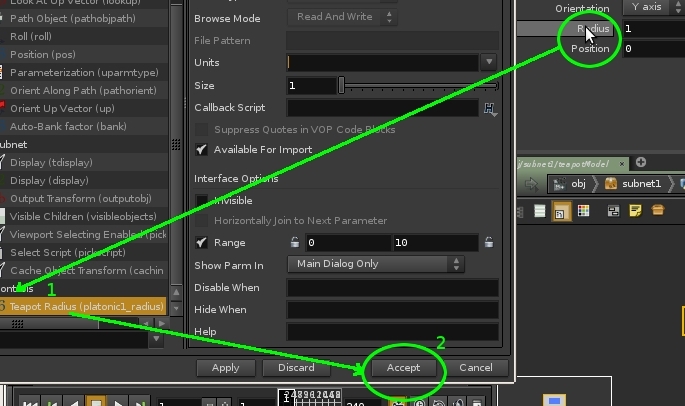
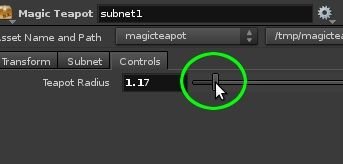
Promote custom controls
We'll expose the teapot size parameter by promoting it to top level. The goal is for all the controls to be at the top level of the asset so the user can quickly interact with it without having to worry about the internal setup. Drag and drop the 'Radius' on the platonic1 node onto the Controls folder in the asset Type Properties. Click Accept when done.
Congratulations!! You now have your first Digital Asset with custom controls.
Upload your asset to Orbolt
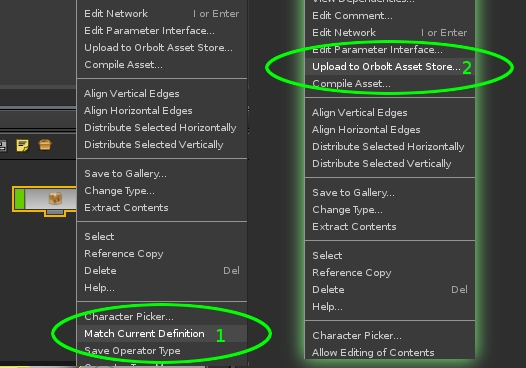
One of the great things about Houdini assets is that they're a great way to share your work with others. Since everything is self contained in a single node, it's easy to give it to others. Orbolt makes this even easier by giving you a central place that assets can be uploaded and downloaded. Before we upload the asset, right mouse button click on the node and choose Match Current Definition. This will sync the asset with the latest changes (if you need to do additional changes you can always unlock it by clicking Allow Editing). Then right mouse button click on the node and choose Upload to Orbolt Asset Store.
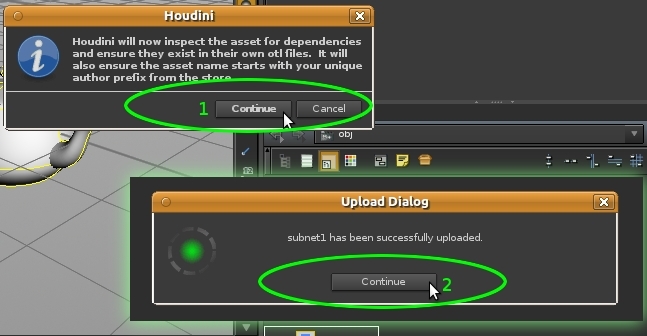
Houdini upload process
The upload process makes sure that all the needed files are found and sends the file to Orblot.
Orbolt info
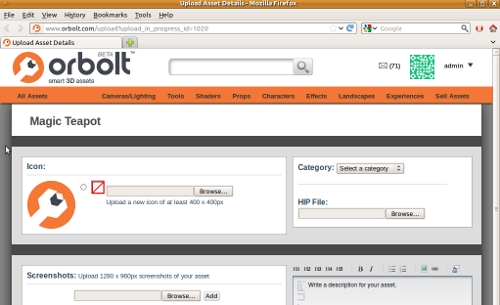
Once the file is uploaded, Orbolt upload page will open in your browser where you can fill in the details about your asset that other users can see. This is where you can show off your asset through videos/screen shots. Here you also specify the price point. It is up to you if you want to share your work with others or sell it and make some profit!!
Hopefully this gave you a better idea about Houdini Digital Assets and Orbolt. If you have any questions or comments freel free to drop us a line at: support@orbolt.com
- Welcome!
- Houdini Versions, Orbolt Assets, and You!
- Anatomy of creating a Houdini asset.. 1..2..3.. Profit!!
- Putting 'smart' in your Smart 3D Assets
- Houdini 12.5 is out!!!
- Assets In The Orbolt Cloud!
- To embed or not to embed.. multiple assets and example hip file.
- Asset Store Update!
- The Time to Start Building Assets is Now!
- Changing asset location
- Orbolt In Studio Environment
- Invalid License Signature fixed!
- Celebrity in the midst!
- Houdini 13 is released!!
- Powered by Houdini!
- Happy New Year!!
- Houdini Engine and Digital Assets!!
- Orbolt Updates!
- Engine Asset Creation!
- Maya Orbolt Browser!!
- Houdini Indie Released
- Asset Request Contest!!
- Indie Support!
- Asset Request Winner!!
- Houdini 14 Sneak Peek!!
- Houdini 14 Released!!
- Houdini Engine for UE 4!
- The Houdini 15 sneak peek is now online
- New Houdini demo reel online
- Houdini 15 released
- Houdini Engine Indie is free!
- Third Party Rendering is being added to Houdini Indie
- Houdini 15.5 released
- Houdini 16 coming soon
- Houdini 16 Down Under
- SideFX is proud to announce the release of Houdini 16.
- Orbolt in Houdini
- Houdini 16.5 Sneak Peek
- Houdini Scientific Engineering Award
- Houdini HIVE Presentations in Utrecht 2018
- Houdini 17 Banshee released!
- Embedded licenses in H17
- Houdini utilized in The Meg
- Global Game Jam with Houdini Contest 2019
- Character FX & Crowds Production Talks
- SideFX Australia Road Trip 2019
- Houdini HIVE at GDC 2019
- Houdini 17.5 Launch Event
- Houdini 17.5 Unveiled
- What is PDG?
- Houdini HIVE Paris 2019
- Dumbo - MPC
- Ant-Man and The Wasp
- SideFX Partners with Unity
- Houdini HIVE at SIGG 2019
- 2019 Houdini Reel
- SideFX Solaris
- Reindeer Ready
- Houdini 18 Launch Presentation
- Houdini HIVE at SIGGRAPH Asia 2019
- Houdini 18 Released
- Global Game Jam with Houdini Contest 2020
- A Real-Time Journey into Houdini
- Building a Procedural FX Pipeline for Age of Empires II
- COVID-19 Update
- Houdini HIVE GameDev - GDC Online
- Embedded Licensing for Studios
- Game Jam 2020 | Houdini Contest Winners
- Houdini HIVE Worldwide
- The Art of Houdini Tests
- Houdini HIVE Worldwide has arrived!
- Houdini and The Lion King
- Control | Remedy Entertainment
- Houdini 18 Backport
- HOULY Daily Challenge
- HOUDINI GAME JAM 2020
- Frozen 2 - Walt Disney Animation Studios
- We've reduced our fees!
- Project Blue Book - Stormborn Studios
- THE HOUDINI GAME JAM WINNERS! 2020
- Houdini 18.5 HIVE
- Houdini 18.5 Released
- Houdini HIVE - Education Edition
- Epic Games Invests in SideFX
- Absolute Post
- The Dawning
- Houdini HIVE Siggraph 2021
- Introducing WetaH
- Project Titan
- Sniper Elite 5 Trailer | Rebellion
- Houdini HIVE - FMX 2022
- Please upgrade to a new build of Houdini 12.1
- We now support copy-protected free assets
- Add movies - Include a Vimeo or YouTube URL at upload time
- VOP Support
- Author Page Enhanced: change icon, add screen shots, rename asset...
- Rate it: Hot or not?
- OpenID bug fixed when syncing
- Including an example file gets faster activation.
- New assets: New Railway builder, new shaders, plus some cool utilities. A lot of these files are open for viewing so you can learn how the author put them together.
- Coming soon:
- Please Upgrade to Houdini 12.1.119 or Higher
- Updates to the Orbolt Smart 3D Asset store, Nov 8th.
- Holiday Contest is coming!
- Holiday Challenge is warming up as December approaches!
- Holiday challenge update!
- Holiday Card Assets
- How to contact an a author.
- What is this construction crew building?
- Anatomy of an Asset
- Anatomy of a Blackhawk 2
- Anatomy of a Blackhawk 4
- Anatomy of a Blackhawk 3
- Shadow Pass Recipe
- More Holiday Submissions
- Example File Guidelines
- Asset overview movies
- Contest Winners!
- Image Based Lighting Basics
- Working With HDR images
- Creating High Dynamic range images
- Adding Images to Help Cards
- Checkout problems with PayPal and Visa on Jan 28th 2013.
- How to add inputs to your asset
- Example files are good as Gold
- Major toolsets could be coming your way.
- March Contest
- High value assets can save you time and money.
- Valentine's day best wishes from the Orbolt Asset store.
- Houdini Artists love your work!
- Asset Author Tools; Upload Tips
- Uploading Dependencies via Author Tools
- March Contest Update
- St. Patrick's Contest Winner!
- Website Update!
- Side Effects Labs!