Shadow Pass Recipe
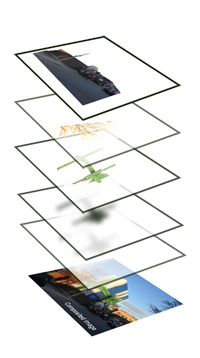
Intro to Layers
Ever notice that CG images tend to have really black shadows? The truth is, %100 black almost never occurs in real life.The "Shadow Pass" recipe, mentioned here is good for all compositors. Give it a try next time you're comping a shadow pass.
Shadow Recipe
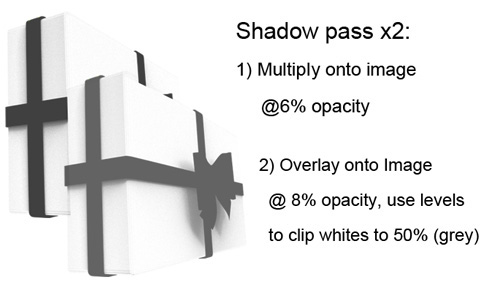
If you were planning on multiplying the shadows at 20% opacity, try 10% instead. Then duplicate the shadow layer and change the apply mode to overlay. On this second shadow pass, apply a levels operation and clip (reduce) the whites by %50. In other words, this overlay layer will have only %50 grey or darker in it.
That's it! Your shadows will be a rich dark color, but not overly black or muddy.
Basic composite example
The following example illustrates how a single CG element was hastily composited onto a photograph. This particular example was done in Photoshop, but the workflow is pretty much the same in Nuke, After Effects or any other package.
Step 1: Clean-up the image
The backplate (photo) was taken with an iPhone as the owner went to work. There were some obvious problems with it; Utility lines and hazard pylons just to name a few. These were edited out just to reduce the clutter of the image. Then the levels were adjusted to lighten the forground shadows a little.

Step 2: Import CG elements
The goal for this shot was to simply add a big bow to the building. The Giftbox Asset was used to creat a big ribbon around a box shape. A beauty pass and cast shadow pass were rendered.
Bear in mind, that in a production setting, this "beauty pass" would itself have been a composite of about 10 layers! e.g. Diffuse Color, Specular, Ambient Occlusion, Subsurface, Reflection etc..

Step 3: Shadows on the building
This is just a quick exercise, so only one beauty pass, and one cast shadow pass were created. This means that the shadows inside the bow itself will not benefit from the shadow pass recipe. It will only affect the shadows cast upon the building.
This shadow pass was rendered using a box as a stand-in for the building. This box had a shadowmatte material applied to it.
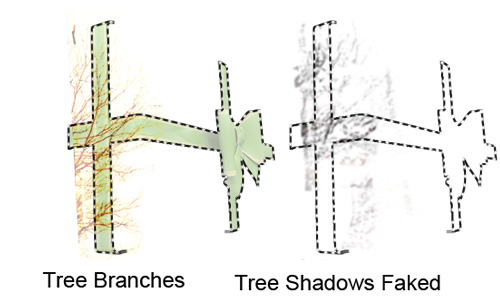
Some shadows had to be faked. In this case the shadow of the tree branches had to be added to the bow in order to match the building.
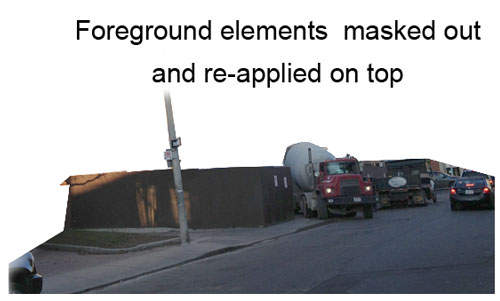
Step 4: Re-Apply Foreground
The foreground fence, tree branches and utility pole, needed to be duplicated from the background, and then re-applied over the bow. This was a manual masking or roto task. The edges of this foreground layer needed to be blurred so as to not appear overly sharp and artificial.
Step 5: Final Composite
Here is the composited image: A gift wrapped building. Some nice touches would be to adjust the bows color levels a bit, to add a specular pass, and maybe some noise to further sell it's integration with the photograph.
Happy Holidays!

All Topics
Blog posts
- Welcome!
- Houdini Versions, Orbolt Assets, and You!
- Anatomy of creating a Houdini asset.. 1..2..3.. Profit!!
- Putting 'smart' in your Smart 3D Assets
- Houdini 12.5 is out!!!
- Assets In The Orbolt Cloud!
- To embed or not to embed.. multiple assets and example hip file.
- Asset Store Update!
- The Time to Start Building Assets is Now!
- Changing asset location
- Orbolt In Studio Environment
- Invalid License Signature fixed!
- Celebrity in the midst!
- Houdini 13 is released!!
- Powered by Houdini!
- Happy New Year!!
- Houdini Engine and Digital Assets!!
- Orbolt Updates!
- Engine Asset Creation!
- Maya Orbolt Browser!!
- Houdini Indie Released
- Asset Request Contest!!
- Indie Support!
- Asset Request Winner!!
- Houdini 14 Sneak Peek!!
- Houdini 14 Released!!
- Houdini Engine for UE 4!
- The Houdini 15 sneak peek is now online
- New Houdini demo reel online
- Houdini 15 released
- Houdini Engine Indie is free!
- Third Party Rendering is being added to Houdini Indie
- Houdini 15.5 released
- Houdini 16 coming soon
- Houdini 16 Down Under
- SideFX is proud to announce the release of Houdini 16.
- Orbolt in Houdini
- Houdini 16.5 Sneak Peek
- Houdini Scientific Engineering Award
- Houdini HIVE Presentations in Utrecht 2018
- Houdini 17 Banshee released!
- Embedded licenses in H17
- Houdini utilized in The Meg
- Global Game Jam with Houdini Contest 2019
- Character FX & Crowds Production Talks
- SideFX Australia Road Trip 2019
- Houdini HIVE at GDC 2019
- Houdini 17.5 Launch Event
- Houdini 17.5 Unveiled
- What is PDG?
- Houdini HIVE Paris 2019
- Dumbo - MPC
- Ant-Man and The Wasp
- SideFX Partners with Unity
- Houdini HIVE at SIGG 2019
- 2019 Houdini Reel
- SideFX Solaris
- Reindeer Ready
- Houdini 18 Launch Presentation
- Houdini HIVE at SIGGRAPH Asia 2019
- Houdini 18 Released
- Global Game Jam with Houdini Contest 2020
- A Real-Time Journey into Houdini
- Building a Procedural FX Pipeline for Age of Empires II
- COVID-19 Update
- Houdini HIVE GameDev - GDC Online
- Embedded Licensing for Studios
- Game Jam 2020 | Houdini Contest Winners
- Houdini HIVE Worldwide
- The Art of Houdini Tests
- Houdini HIVE Worldwide has arrived!
- Houdini and The Lion King
- Control | Remedy Entertainment
- Houdini 18 Backport
- HOULY Daily Challenge
- HOUDINI GAME JAM 2020
- Frozen 2 - Walt Disney Animation Studios
- We've reduced our fees!
- Project Blue Book - Stormborn Studios
- THE HOUDINI GAME JAM WINNERS! 2020
- Houdini 18.5 HIVE
- Houdini 18.5 Released
- Houdini HIVE - Education Edition
- Epic Games Invests in SideFX
- Absolute Post
- The Dawning
- Houdini HIVE Siggraph 2021
- Introducing WetaH
- Project Titan
- Sniper Elite 5 Trailer | Rebellion
- Houdini HIVE - FMX 2022
Press releases
Updates
- Please upgrade to a new build of Houdini 12.1
- We now support copy-protected free assets
- Add movies - Include a Vimeo or YouTube URL at upload time
- VOP Support
- Author Page Enhanced: change icon, add screen shots, rename asset...
- Rate it: Hot or not?
- OpenID bug fixed when syncing
- Including an example file gets faster activation.
- New assets: New Railway builder, new shaders, plus some cool utilities. A lot of these files are open for viewing so you can learn how the author put them together.
- Coming soon:
- Please Upgrade to Houdini 12.1.119 or Higher
- Updates to the Orbolt Smart 3D Asset store, Nov 8th.
- Holiday Contest is coming!
- Holiday Challenge is warming up as December approaches!
- Holiday challenge update!
- Holiday Card Assets
- How to contact an a author.
- What is this construction crew building?
- Anatomy of an Asset
- Anatomy of a Blackhawk 2
- Anatomy of a Blackhawk 4
- Anatomy of a Blackhawk 3
- Shadow Pass Recipe
- More Holiday Submissions
- Example File Guidelines
- Asset overview movies
- Contest Winners!
- Image Based Lighting Basics
- Working With HDR images
- Creating High Dynamic range images
- Adding Images to Help Cards
- Checkout problems with PayPal and Visa on Jan 28th 2013.
- How to add inputs to your asset
- Example files are good as Gold
- Major toolsets could be coming your way.
- March Contest
- High value assets can save you time and money.
- Valentine's day best wishes from the Orbolt Asset store.
- Houdini Artists love your work!
- Asset Author Tools; Upload Tips
- Uploading Dependencies via Author Tools
- March Contest Update
- St. Patrick's Contest Winner!
- Website Update!
- Side Effects Labs!